The main component required for running a cluster of servers at your home is supplying them with uninterrupted power. Not only is powering them correctly important, it is also important that the servers can shut down gracefully in the event of a power failure. The standard way to do this in linux is to use NUT. My current home setup consists of cluster of raspberry pis and a Synology NAS. The below configs are a documentation of the NUT master, slave and Synology DSM config.
Nut consists of three layers
- Ups configuration
- Nut server configuration
- Nut clients configuration
Master configuration
First we will configure the cluster master which is the machine to which the ups is physically connected to. Once we are done with the master, we will configure clients and the Synology device to connect to the master for status updates. We will start by install nut
sudo apt-get install nut
Configuring the ups
The master is the device to which the ups is directly connected to (usb cable in my case)
Declare your ups type at the end of the file
sudo vi /etc/nut/ups.conf
| |
Notes
- The name is ups so that Synology can interface with this server.
- The description can be any value you want.
- The driver that is supported for your ups can be found at https://networkupstools.org/stable-hcl.html. For they ups I have the driver is
usbhid-ups
Configure nut mode
The master is configured to run as a netserver (Not nutserver)
sudo vi /etc/nut/nut.conf
| |
Make nut listen to incoming connections
sudo vi /etc/nut/upsd.conf
| |
Notes
- We are listening on 127.0.0.1 to allow the local nut client to listen.
- We are listening on
youripto allow remote nut clients to listen. - This apparantely makes sense in data centers or servers with multiple network cards. This may not be that relevant for our usecase
Creating users for nut service
These are standalone users. They need not be created on your operating system.
sudo vi /etc/nut/upsd.users
| |
Notes
- The admin user has permissions to change configurations (actions) and issue commands (instcmds).
- The upsmon user just listens to the ups status and can shut down this system
- The upsmon-remote does the same but for remote clients.
- monuser is for Synology. This user has a password of
secret. If this doesn’t work, we need to figure out the synology default password for ups.
Configuring the monitors
sudo vi /etc/nut/upsmon.conf
We are going to ask the NUT service to MONITOR the ups which is connencted to localhost with powervalue 1 using user upsmon and password NOPE as role master. The meaning of most of these are defined just above this line inside the file.
| |
If you dont want your master to bring down your network
On the same file, comment out POWERDOWNFLAG /etc/killpower if you dont want your cluster master to bring down your whole network. In my case, my cluster master is a raspberry pi and my ups powers my modem, and access points. I dont want my cluster master to bring down my internet when it reboots. So I had to comment out this line.
| |
Configuring notifications
On the same file, you can comment out NOTIFYFLAG online and onbat to receive wall notifications on your terminal when the state of ups changes.
| |
Client configuration
We should configure nut client on servers other than the machine to which the ups is physically connected to if we want them to shut down during power failure. Install nut on the client machines
sudo apt-get install nut
Setup the nut mode
Nut client should run in the client mode. Note netclient and not nutclient
sudo vi /etc/nut/nut.conf
| |
Configure monitor
Edit the upsmon config file to tell upsmon where & how to connect to and listen for ups status
| |
masterip with your cluster master ip and REDACTED with your passwordChange permissions of the config files.
Because the configuration files have passwords in them, it is a good practice to change the permissions of these files. On all the servers, run the below commands
sudo chown nut:nut /etc/nut/*
sudo chmod 640 /etc/nut/upsmon.conf
Reboot
The nut service started working for me only after rebooting. So reboot all your servers.
sudo reboot
Verify that the daemon is running
Once your system is up, verify that the nut demon is running.
sudo service nut-server status
Check communication with the ups
On your master node, you can verify that you can connect with the ups by running
upsc ups
And on the client nodes,
upsc ups@clustermasterip
You should get a response that looks similar to the one below
Init SSL without certificate database
battery.charge: 100
battery.charge.low: 10
battery.charge.warning: 20
battery.mfr.date: CPS
battery.runtime: 4560
battery.runtime.low: 300
battery.type: PbAcid
battery.voltage: 24.0
battery.voltage.nominal: 24
device.mfr: CPS
device.model: CP1000PFCLCD
device.serial: 000000000000
device.type: ups
driver.name: usbhid-ups
driver.parameter.pollfreq: 30
driver.parameter.pollinterval: 2
driver.parameter.port: auto
driver.parameter.synchronous: no
driver.version: 2.7.4
driver.version.data: CyberPower HID 0.4
driver.version.internal: 0.41
input.transfer.high: 139
input.transfer.low: 88
input.voltage: 122.0
input.voltage.nominal: 120
output.voltage: 138.0
ups.beeper.status: enabled
ups.delay.shutdown: 20
ups.delay.start: 30
ups.load: 6
ups.mfr: CPS
ups.model: CP1000PFCLCD
ups.productid: 0501
ups.realpower.nominal: 600
ups.serial: 000000000000
ups.status: OL
ups.test.result: No test initiated
ups.timer.shutdown: -60
ups.timer.start: -60
ups.vendorid: 0764
Unplug your ups and make sure your system shutsdown as expected.
Synology configuration
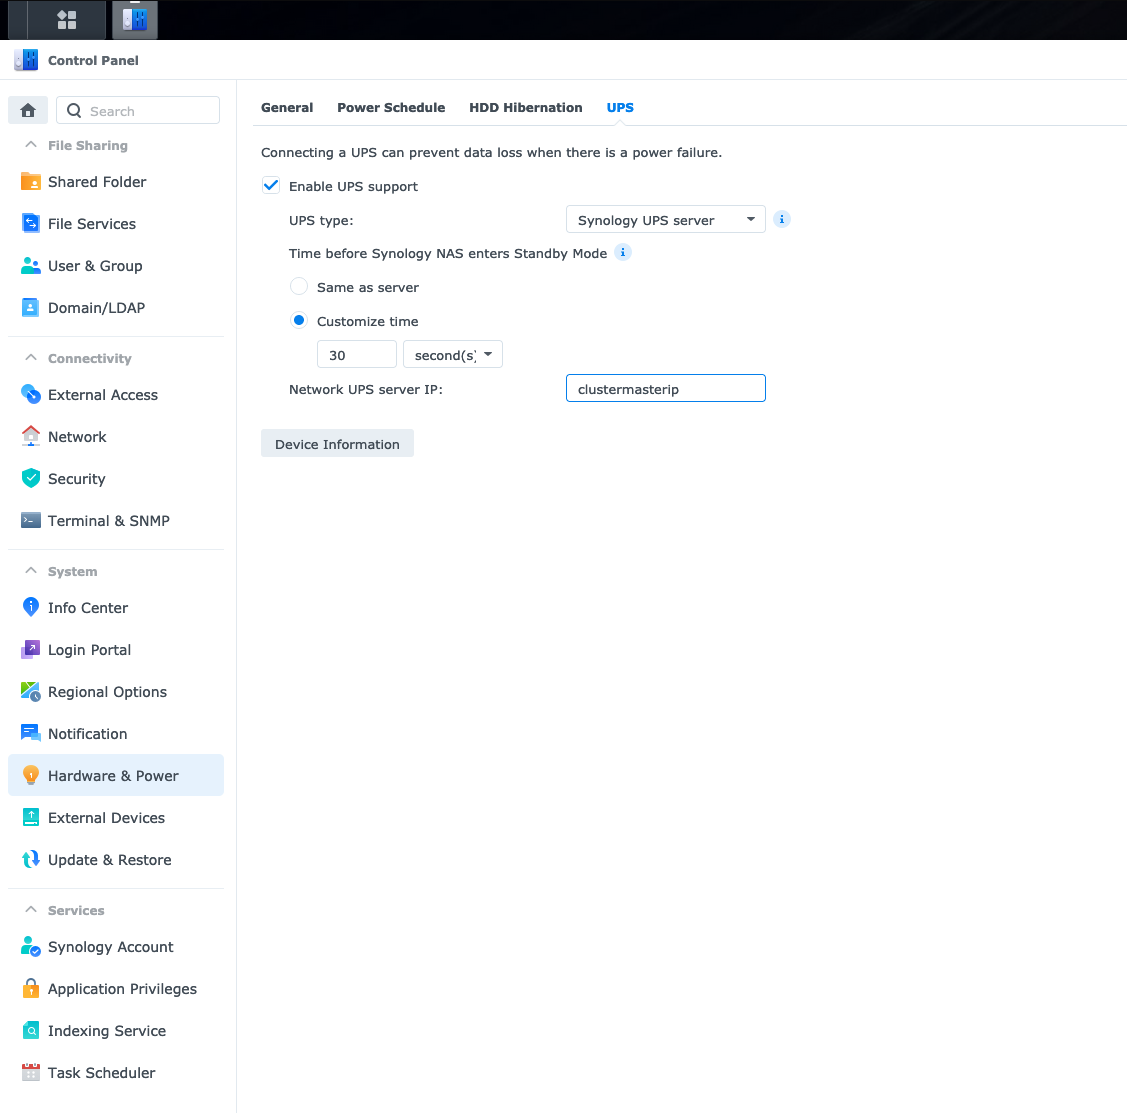
We have created user monuser who have access to the ups named ups with password secret. All we need to do is go to power management in Synology and the ip address of our cluster master as the Network UPS server IP.

If you click on the device information after saving your settings, you should be able to see your UPS name and battery levels.
Now you have your cluster powered by your UPS!